User Onboarding and Offboarding
Applies to: Version 6.4 and later
Last updated: 25 August 2025
This document explains how to onboard and offboard users in the Whānau Tahi Navigator system.
Prerequisites
You will require User Administrator, License Administrator, and Power Platform Administrator (or simply Global Administrator) access to configure users in the Office 365 admin centre and Power Platform. If you have an IT provider that manages licensing on your behalf, contact them first to ensure appropriate access permissions are established.
Workstation Requirements
Before onboarding users, ensure their workstations meet the minimum requirements for Windows 11, Microsoft Edge, Power Platform, and Dynamics 365. Meeting these specifications ensures a smooth, performant experience with the Navigator application.
Operating System
| Component | Recommended Specification |
|---|---|
| Operating System | Windows 11 (latest version) |
| Processor | 3.3 GHz or faster, 64-bit dual-core or quad-core |
| Memory (RAM) | 16 GB or more |
| Storage | 128 GB or more (SSD recommended) |
| Display | 1920 x 1080 (Full HD) or higher |
| Graphics | DirectX 12 compatible with WDDM 2.0 driver |
| System Firmware | UEFI, Secure Boot capable |
| TPM | TPM version 2.0 |
Important
Memory Recommendation
While Microsoft's minimum specifications list 8 GB RAM, we strongly recommend 16 GB or more for Navigator users. Typical usage involves multiple browser tabs, Power BI reports, and other Microsoft 365 applications running simultaneously. Users with less than 16 GB RAM may experience out-of-memory errors and degraded performance.
Note
Windows 11 Specific Requirements
Windows 11 requires TPM 2.0 and Secure Boot. If your organisation is upgrading from Windows 10, use the PC Health Check app to verify device eligibility. Windows 11 provides enhanced security features and better integration with Microsoft 365 services.
Web Browser
Microsoft Edge (Chromium-based) is the recommended browser for accessing Whānau Tahi Navigator and all Dynamics 365 / Power Platform applications. Edge is optimised for Microsoft's cloud services and provides significantly better performance than other browsers.
| Browser | Support Status | Notes |
|---|---|---|
| Microsoft Edge (Chromium) | ✅ Recommended | Latest three major versions supported. Best performance with Dynamics 365 (up to 2x faster than legacy browsers). |
| Google Chrome | ✅ Supported | Latest three major versions supported. |
| Mozilla Firefox | ✅ Supported | Latest three major versions supported. |
| Apple Safari | ✅ Supported | Version 13 and later (macOS only). |
| Internet Explorer | ❌ Blocked | No longer supported. Users will be redirected to Edge. |
Important
Why Microsoft Edge?
- Performance: Experiences in Dynamics 365 and Power Apps are up to twice as fast on Microsoft Edge compared to legacy browsers
- Security: Seamless integration with Microsoft Entra ID (Azure AD) Conditional Access and enterprise security policies
- Productivity: Microsoft Edge for Business provides automatic work/personal browsing separation and enhanced enterprise controls
- Accessibility: Tested and verified with Microsoft Narrator, NVDA, and JAWS screen readers
- Updates: Automatic updates ensure compatibility with the latest Power Platform features
Download Microsoft Edge from: https://www.microsoft.com/edge
Network Requirements
Adequate network connectivity is essential for optimal Navigator performance.
| Requirement | Minimum | Recommended |
|---|---|---|
| Bandwidth | 50 KBps (400 kbps) | 1 Mbps (1000 kbps) or higher |
| Latency | Under 150 ms | Under 100 ms |
| Connection | Stable internet connection | Stable broadband connection |
Note
Network Considerations
- The minimum bandwidth requirements are based on uncustomised, out-of-the-box forms
- Customised forms, Power BI reports, and large datasets may require additional bandwidth
- For voice/video features (e.g., Teams integration), recommended bandwidth is 8 Mbps upload / 16 Mbps download
- Ensure your network allows access to Microsoft 365 and Dynamics 365 URLs and IP ranges. Refer to Microsoft's documentation on Power Platform URLs and IP address ranges for the complete list.
Power BI Desktop (Optional)
If users will be creating or editing Power BI reports locally, they will need Power BI Desktop installed. In addition to the workstation requirements above, Power BI Desktop has the following specific requirements:
| Component | Requirement |
|---|---|
| Display | 1440 x 900 or 1600 x 900 (16:9) minimum; 1920 x 1080 or higher recommended |
| .NET Framework | 4.7.2 or later |
Tip
Power BI Desktop can be downloaded from the Microsoft Store or from Microsoft's Power BI download page.
Additional Hardware (As Needed)
Depending on user roles and features utilised:
| Feature | Hardware Required |
|---|---|
| Teams Integration / Video Calls | Webcam, microphone, speakers |
| Biometric Authentication (Windows Hello) | Fingerprint reader or IR camera |
| Touch Navigation | Touch-enabled display |
Onboarding Users
There are 9 main tasks to be completed in the onboarding process:
Infrastructure / Azure AD Tasks
- Create user account in Azure AD (or Microsoft 365)
- Apply required Microsoft licenses to users
- Add users to required Azure Active Directory Security Groups
Application Tasks
- Assign users to a business unit
- Apply security roles
- Add users to required teams
- Configure default ownership teams
- Provide users with connection details (URLs or Office Navigation Paths)
- Verify that users can login, and that they have the correct timezone and date format selected
Infrastructure / Azure AD
Configure User in Azure Active Directory
The following steps should be carried out within your Azure Active Directory:
Create user accounts in Azure AD
- Refer to your internal process or to Microsoft documentation for this procedure.
Apply licenses to the user
- The following licenses should be applied. Choose either Minimal or Full licensing models as outlined below. Some users can be minimal and some can be full. The license model chosen does not affect functionality in the Navigator system. The main impact of this choice is on cost and ability to use other Dynamics applications. Costs for these licenses are set by Microsoft. The minimal license model restricts the use of additional Dynamics features. The full model provides access to a wider range of Dynamics App features, and can be extended to include additional Dynamics apps at a later stage:
EITHER [Minimal Dynamics 365 Option]
Dynamics 365 Team Membersand one of the following:
 Power Apps Per App Plan (*only applicable if not using TXT Message capability*) or
 Power Apps Premium
and one of the following:
 Power BI Pro or
 Power BI Premium Per User or
 Power BI Premium Per Capacity
OR [Full Dynamics 365 Option]
one of the following:
 Dynamics 365 Sales Enterprise
 Dynamics 365 Customer Service
and one of the following:
 Power BI Pro or
 Power BI Premium Per User or
 No Power BI license (only when BI Premium Per Capacity is used - see Note)
- The following licenses should be applied. Choose either Minimal or Full licensing models as outlined below. Some users can be minimal and some can be full. The license model chosen does not affect functionality in the Navigator system. The main impact of this choice is on cost and ability to use other Dynamics applications. Costs for these licenses are set by Microsoft. The minimal license model restricts the use of additional Dynamics features. The full model provides access to a wider range of Dynamics App features, and can be extended to include additional Dynamics apps at a later stage:
Note
Licensing Notes
a. If the Contract Performance dashboard is to be used, then all users that manage or access this Dashboard must use the Full Dynamics 365 Option licenses above. This is because the Contract Performance dashboard uses Dynamics 365 features that require the Sales or Customer Service licenses.
b. This note only applies if Power BI Premium Per Capacity is used: Under the premium capacity model, regular users do not require a Power BI License. However, anyone that publishes content to Power BI does require a Power BI Pro or Power BI Premium license (and this includes the Whānau Tahi Service Operations user account).
- Add users to Security Groups that enable access to specific Whānau Tahi Navigator environments
- Each environment has a corresponding AAD Security Group. Only members of the environment Security Group will be able to access the environment.
- Standard environments include:
- Production [All users should belong to this]
- Pre-Production [Only users involved in sign-off for upgrades should belong to this]
- Training [All users should belong to this]
- Test [Only users involved in UAT should belong to this group]
- Optional environments include:
- Custom [Only those involved in configuring new components should belong to this]
- CustomTest [Only those involved in configuring new components should belong to this]
Application Tasks
Configure user in Power Platform environments
The steps outlined below need to be done in each environment that the user is given access to (by virtue of their membership in one or more of the environment access Security Groups).
- Open the Power Platform admin portal: https://admin.powerplatform.microsoft.com
- Select Environments on the navigation bar to the left of the window
- Select the target environment you are setting up (i.e., Production, Pre-Production, Training, or Test)
- Choose Settings from the toolbar at the top of the window
- Under the heading Users + permissions select Users
- Locate the new user in the list of users, and select that user
- On the User toolbar, select Change business unit and assign them to the appropriate business unit
- On the user toolbar, select Manage security roles and assign them to the appropriate security role
- On the user toolbar, select Manage Teams and assign them to the special MRO team, and to any other teams that the user should belong to
Note
For base level credentials, assign Basic User and Navigator security roles. This will give the minimum role assignment for Navigator to function. The naming conventions for each role may differ per organization. Your System Administrator should have an understanding of how each role differs and what they provide.
Configure the user in the Whānau Tahi Navigator application
- Open the target environment, e.g. https://myprod.crm.dynamics.com
- Open the Whānau Tahi Backoffice app
- Select Configuration > System : User Team Roles
- Create two records here, by using the + New button on the toolbar:
- For the first record, choose the user name, choose the MRO team, and select Individual Team Owner as the team role
- For the second record, choose the user name, choose the MRO team, and select Organization team owner as the team role
- The user is now set up and can logon to the system. Provide details on how to login, and verify that they can do so. Also have them check that their date format and timezone settings are set correctly in their application personal settings
Important
To ensure initial user set up is done correctly, it is highly advisable to read the guide on GlobalMRO and how it is configured and works into your users' experience with Navigator.
Adding users to Team Views
- Open the target environment, e.g. https://myprod.crm.dynamics.com
- Open the Whānau Tahi Back Office app
- Select Configuration > User Configurations
- Click + New to add a User Configuration record
- Select the User
- Click the Save button
- On the new Contract Service section that has appeared, click Add Existing Contract Service
- Click the magnifying glass to look for Contract Service records or simply start typing the name of the Contract Service
- Select the Service
- Click Add
- Click Save & Close
Configuring a User as a Supervisor and assigning Students to them
- Open the target environment, e.g. https://myprod.crm.dynamics.com
- Open the Whānau Tahi Back Office app
- Select Configuration > User Configurations
- Click + New to add a User Configuration record
- Select the User
- Select Supervisor under Role Category dropdown
- Click the Save button
- On the new Students section that has appeared, click Add Existing User to assign a Student to the Supervisor
- Click the magnifying glass to look for User records or simply start typing the name of the Student
Verify User Settings
Important
Remind new users to check their personal settings and ensure that
(1) they have the correct formatting style, and
(2) they have the correct time zone.
Timezone and Format Configuration
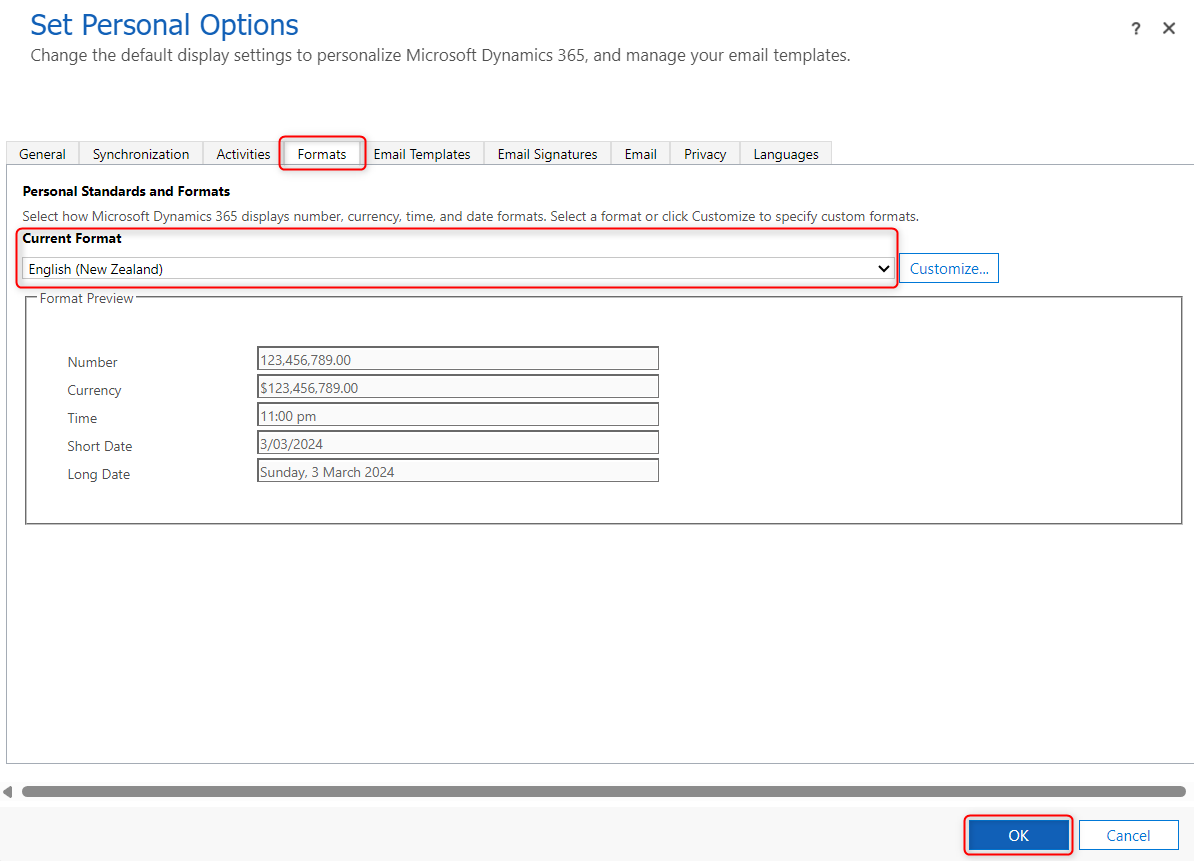
To change Navigator to the correct local timezone:
- Click on the Settings icon on the top right of the screen that looks like a cog

- Click on Personalization Settings
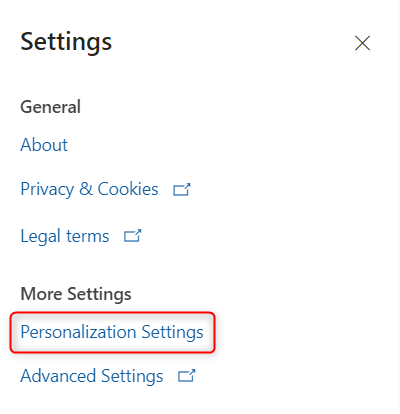
- In the General tab, locate the Time Zone section. Select your local timezone
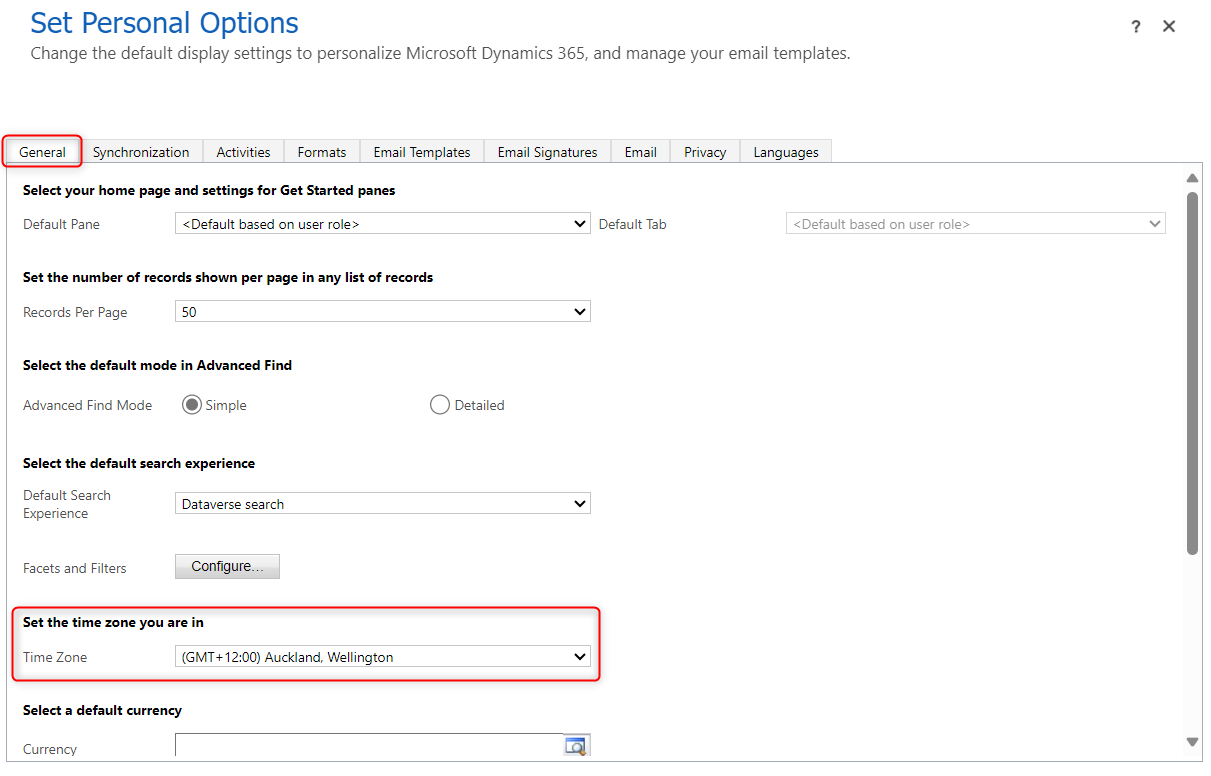
- Click on the Formats Tab. Select your local format then click OK
Offboarding Users
The following procedure explains how to offboard users from the Whānau Tahi Navigator system. Offboarding is essentially the reverse of the onboarding process: instead of assigning licenses, security roles, and permissions, these are systematically removed.
There are 4 main tasks to be completed in the offboarding process:
- Reassign work/caseload to other users
- Remove security roles and team memberships
- Deactivate User Team Roles
- Remove Microsoft licenses
Important
Please ensure that security roles and Dynamics 365 licenses are removed correctly to avoid ongoing monthly licensing costs. Whānau Tahi is entitled to collect licence costs for any users that have access to any tables owned by Whānau Tahi at any point during a given month. Whānau Tahi does not bear any responsibility for offboarding errors and customers are not entitled to recover licence fees.
Part 1: Reassign Caseload to Appropriate Users
Before removing a user's access, you must reassign any active work they are responsible for to other team members.
- Open the target environment, e.g. https://myprod.crm.dynamics.com
- Open the Whānau Ora Planning app
- Locate all active cases, tasks, or records assigned to the departing user
- Reassign each item to the appropriate team member who will take over responsibility
- Verify that all work has been successfully reassigned and no orphaned records remain
Part 2: Remove Security Roles and Team Memberships
The steps outlined below should be performed in each environment the user has access to.
- Open the Power Platform admin portal: https://admin.powerplatform.microsoft.com
- Select Environments on the navigation bar to the left of the window
- Select the target environment (e.g., Production, Pre-Production, Training, or Test)
- Choose Settings from the toolbar at the top of the window
- Under the heading Users + permissions select Users
- Locate the user in the list of users, and select that user
- On the user toolbar, select Manage security roles
- Remove all security roles assigned to the user by unchecking them
- Select Save
- On the user toolbar, select Manage Teams
- Remove the user from all teams, including the MRO team
- Select Save
Part 3: Deactivate User Team Roles
- Open the target environment, e.g. https://myprod.crm.dynamics.com
- Open the Whānau Tahi Back Office app
- Select Configuration > System : User Team Roles
- Locate the two User Team Role records for the departing user (Individual Team Owner and Organisation Team Owner)
- Deactivate both records by selecting them and choosing Deactivate from the toolbar
- Alternatively, you can delete these records if your organisational policy permits
Part 4: Remove Dynamics 365 Licenses
Reducing the number of licenses is a separate step that can only be performed by the global admin or billing admin.
- Open the Office 365 Admin Centre: https://admin.microsoft.com
- Select Users from the navigation on the left
- From the dropdown menu, select Active Users
- Search or select the user you want to offboard and open their user profile
- Under the Licenses and Apps tab, untick all licenses assigned to the user:
- Dynamics 365 Team Members (or Sales Enterprise/Customer Service)
- Power Platform licenses
- Power BI licenses
- When finished, press Save Changes
- Verify the license status changes to "Unlicensed"
Part 5: Remove from Azure AD Security Groups
To completely remove the user's ability to access any Whānau Tahi Navigator environments:
- Access your Azure Active Directory (Entra ID) admin center - https://entra.microsoft.com
- Navigate to Groups
- Locate the Security Groups for each environment (Production, Training, Test, etc.) - you can validate which group governs access to each environment by going to https://admin.powerplatform.microsoft.com, clicking on the "Manage", click on the environment, and reviewing the value under the "Security group" heading
- Remove the user from each relevant Security Group
- The user will no longer be able to access these environments
Note
If you are permanently removing the user from your organization, you may also want to delete or disable their Azure AD account according to your internal procedures. This is separate from the Navigator offboarding process.